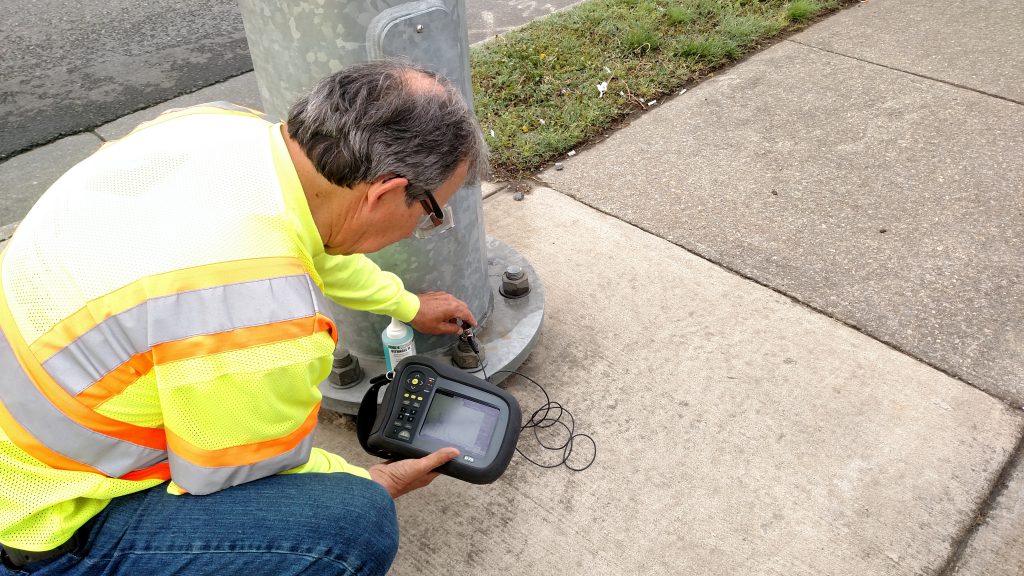
Ultrasonic Testing of Bolts and Pins
Longitudinal Beam Review
By David Reid, CWI
The goal of this article is to share what I have learned over the years about ultrasonic longitudinal beam inspections for flaw detection on anchor bolts, shafts, bridge pins, and header bolts, which is different than thickness gauging or looking for laminations in a base metal. This article was originally released in the American Society for Nondestructive Testing publication, The NDT Technician.
A longitudinal beam is also known as a straight beam, or compression wave. Some people think that technicians who are certified as Level II ultrasonic testing (UT) thickness can also do longitudinal beam inspections. That may or may not be true, depending on what kind of training they have had. For instance, do they know how to use a flaw detector or is their experience limited to just using thickness gauge instruments? With that in mind, I recommend using a Level II UT shear wave technician to do this inspection due to the experience that comes from doing shear wave inspections with a flaw detector where one learns to recognize the differences between good and bad indications. Shear wave testing, also known as angle beam testing, is different than straight beam testing, and is used to examine welds. Shear wave testing technicians must be knowledgeable of special codes and standards and as such have a specialized skill set for certain applications.
One of the first things a UT technician should ask for is the available reference standard. Ultrasonic inspection procedures have acceptance criteria relative to a reference standard. One of the most common reference standards is an International Institute of Welding (IIW) block. It has a serial number and can be
traced back to the manufacturer who can certify that it meets all applicable material and dimensional specifications.
What the technician might actually be asking for is a “special” reference standard. It could be a shaft that is the same shape and size as what needs to be inspected. It would have machined notches to represent cracks. It should have a serial number and be traceable back to the machine shop that made it and can certify what material was used to make it plus the length, depth, and width of the notches. If it cannot be
certified, it would be on the responsible nondestructive testing (NDT) Level III to decide whether it is acceptable for use as a “special” reference standard.
When there is no “special” reference standard available, the inspection can be done with what is available. When it comes to longitudinal beam inspections, the IIW block can be used with the ultrasonic instrument to calibrate for the length of the item being inspected. This can be done using an IIW block as a thickness calibration block. The transducer is in position E as shown in AWS D1.1, Figure 6.23 (AWS, 2010). The flaw
detector is set at a range that is only slightly longer than what is being inspected for multiple indications at 4, 8, 12, 16 in., and so on. The multiple indications are used for calibrating length. The purpose of this is to know the length of the item being inspected and how far the indication is below the transducer.
A drawing of the item to be inspected should be made available to the technician. This drawing should show how long the item is and how far below the surface are any radiuses, keyways, or the start of a taper in the diameter of a shaft. Any of these might be where a crack may originate and/or be the source of a non-relevant geometry indication. With anchor bolts, it helps to know if it is a hook end, chisel point end, or if it has a flat head. Often the customer will want to know if a straight or threaded rod was used. If it is a hook end, odds are that you will not see a back reflection due to the geometry of the hook end. But if it is a flat end, you might see the back reflection.
The inspection procedure needs to be specific to the item being inspected. The procedure should state what percentage of full screen height (FSH) is needed. Some procedures say 80 to 100% FSH from the first back reflection; another procedure may say the same thing but to add an additional 20 dB of gain to the 100%. Another procedure may say 80 to 100% FSH from the second back reflection.
Most procedures specify a single-element contact longitudinal beam transducer that produces a 0° beam. This is different than dual-element transducers, which produce a V-shaped beam. Dual-element transducers are typically used with thickness gauge instruments; single-element transducers are typically used with flaw detectors. Some procedures use transducers with a refracted longitudinal beam as shown in ASTM E 587, Figure 17 (ASTM, 2010).
The transducer frequency and element size should be specified in the procedure. Some procedures specify only one transducer; other procedures specify doing the inspection using two different transducers with different frequencies. But when it comes to doing longitudinal beam ultrasonic inspections, the effects of
a wide beam divergence angle are often overlooked. Beam divergence is reduced with a higher frequency and/or a larger element size transducer. Beam divergence should be kept to a minimum, but if the specific procedure requires using a transducer with a wide beam divergence, its side effects should be known.
A transducer with a wide beam divergence can accurately measure the length of the item being inspected, but the wide beam divergence can generate mode conversion indications. Mode conversion indications can be a reflection from a change in geometry or refraction from a tight fit with a bushing. If you are inspecting the same area with two different transducers with different beam divergence angles, you may see mode conversion indications from the same change in geometry or crack appearing at different locations on the screen.
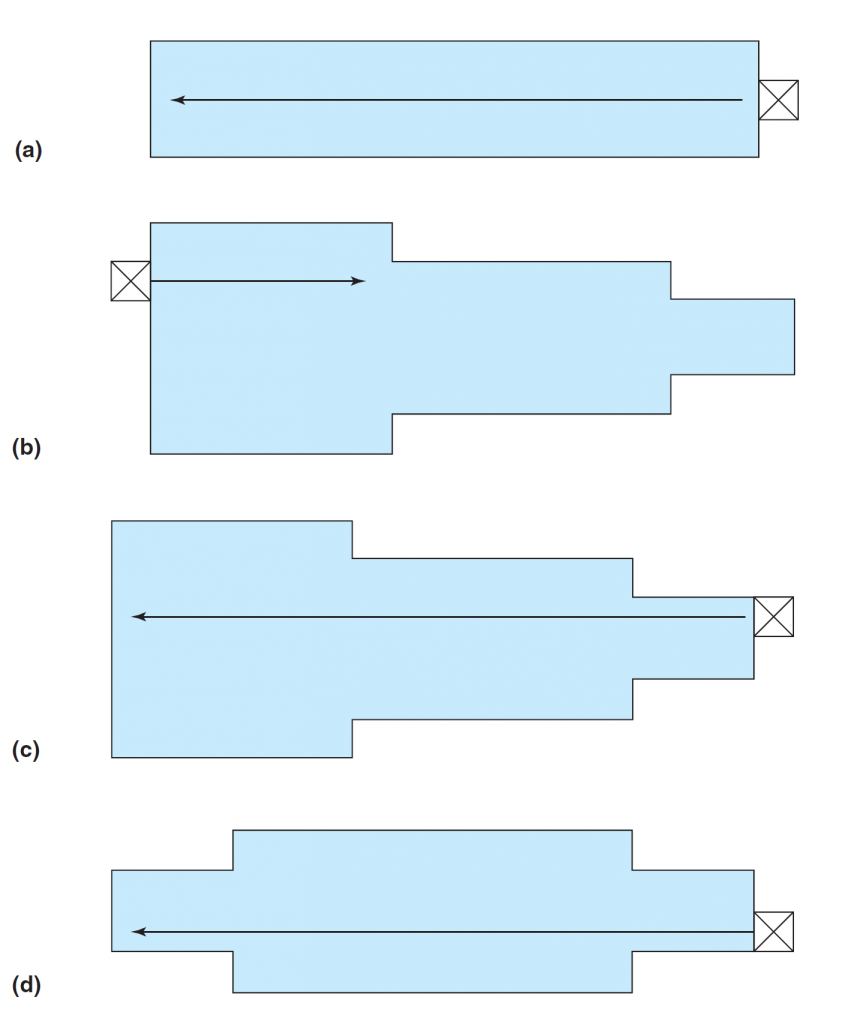
As stated before, the drawing can help identify where a non-relevant indication or crack may originate. An example of this would be from a step radius as shown in Figures 1b, 1c, and 1d. Non-relevant indications typically have low amplitude and are wide along the baseline (short, fat, and sloppy) as shown in Figure 2a. Cracks typically have high amplitude and narrow along the baseline (tall, sharp, and tight) as shown in Figures 2b and 2d. The reason why crack indications are typically tall, sharp, and tight is due to the differences in the acoustic impedance across the reflection interface between the base metal and the crack, which is essentially air.
A Closer Look
Figures 1a–d refer to a 0° transducer. Figures 2a–d are screen presentations. The Y axis is on the left side of the screen and displays the percentage of FSH, 0 to 100%. The X axis is along the bottom of the screen and shows major units of a scale, 0 to 10, for measuring distance below the transducer. The value of each unit depends on the calibration and range setting.
NDT glossary
SHEAR WAVE TESTING
Entries adapted from the nondestructive Testing Handbook, third edition: Vol. 7, Ultrasonic Testing. Columbus, OH: American Society for Nondestructive Testing (2007).
Angle beam testing: Technique of
ultrasonic testing in which transmission of ultrasound is at an acute angle to the entry surface.
Angle beam transducer: Transducer that transmits or receives ultrasonic energy at an acute angle to the surface. This may be done to achieve special effects such as setting up transverse or surface waves by mode conversion at an interface.
Transverse wave: Type of wave in which the particle motion is perpendicular to the direction of propagation. Also called shear wave.
Snell’s Law: Physical law that defines the relationship between the angle of incidence and the angle of refraction.
Range: Maximum ultrasonic path length that is displayed.
Pitch-catch technique: Ultrasonic test technique that uses two transducers, one transmitting and the other receiving on the same or opposite surface. Also called double-crystal technique or two-transducer technique.
Wedge: Device used to direct ultrasonic energy into a test object at an acute angle.
Lamb wave: Type of ultrasonic wave propagation in which the wave is guided between two parallel surfaces of the test object. Mode and velocity depend on the
product of the test frequency and the thickness. Plate wave.
A-scan: One-dimensional display of ultrasonic signal amplitude as function of time or depth in test object.
B-scan: Data presentation technique typically applied to pulse-echo techniques. It produces a 2D view of a cross-sectional plane through the test object. The horizontal sweep is proportional to the distance along the test object and the vertical sweep is proportional to depth, showing the front and back surfaces and discontinuities between.
C-scan: Presentation technique applied to acoustic data and displaying an image of 2D test object with scaled grays or colors
representing the ultrasonic signals. The amplitude represented in each pixel may be a pulse-echo, through-transmission, or pitch catch value calculated from each
A-scan datum.
In Figure 1a, the transducer is on the right side of an anchor bolt standard. When it comes to anchor bolts, the area of interest
is the protrusion above the concrete the anchor bolt is set in. The threads on the anchor bolt represent changes in geometry that will cause multiple mode conversion indications. This can generate a lot of clutter on the screen. Using a transducer with a narrow beam divergence gives a cleaner presentation on the screen.
In Figure 1b, the transducer is on the left side of a shaft above two different step-down radiuses. Both step down from a large diameter to a small diameter. A geometry indication from a step-down will be seen and should remain consistent while scanning. If a transducer with a wide beam divergence is being used, geometry indications from the shoulder radiuses will be seen at the same time as the step-down
radiuses. It might help to decrease the range on the flaw detector to get better resolution between a suspect reject indication and the
geometry indication.
In Figure 1c, the transducer is on the right side of a shaft above two different step-up radiuses. Both step up from a small diameter to a larger diameter. You should not see a geometry indication from the first step-up unless you are using a transducer with a wide beam divergence. Some procedures use a transducer with a refracted
longitudinal beam of 11° to reach the second step-up radius, which can be difficult to do with a 0° transducer.
In Figure 1d, the transducer is on the right side of a shaft above both a step-up radius and a step-down radius. You should not see a geometry indication from the first step (the step-up) unless you are using a
transducer with a wide beam divergence. Wide beam divergence may prevent the second step (the step-down) from being observed, even though there is a reflection from the back wall.
Paper Mill Case Study
Figures 2a and 2b are from a reel spool shaft at a paper mill. The customer did not have a detailed drawing except to say it was similar to Figure 1c. It was possible to determine the length was 114.3 cm
(45 in.). Calibration was done on an IIW block with the range set at 114.3 cm (45 in.), which put the first back reflection from the shaft at 10 on the X axis. This meant each major unit was equal to 11.4 cm (4.5 in.). The procedure required 80 to 100% FSH from the first back reflection.
The gate was positioned between 2 and 8 on the X axis to cover the suspected location of the steps. The source of the geometry indications was not known, but the reject indication was 35.56 cm (14 in.) below the transducer—the approximate location of the first step-up, as best as could be estimated without a drawing or disassembly of the reel
spool. The transducer that was used was a 0°, 2.25 MHz, 3/8 in. diameter transducer, which has a 39° beam divergence in steel.
Amusement Park Case Study
Figures 2c and 2d are from a cylinder anchor shaft on an amusement park ride. The customer had a drawing that showed it was similar to Figure 1d and it was 78.74 cm (31 in.) long with steps 20.32 cm (8 in.) from each end. Calibration was done on an IIW block with the range set at 157.5 cm (62 in.), which put the second back reflection from the shaft at 10 on the X axis. This meant each major unit was equal to 15.7 cm (6.2 in.). The procedure required 80 to 100% FSH from the second
back reflection. The gate was positioned between 1 and 4 on the X axis to cover both steps. The reject indication was 20.32 cm (8 in.) below the transducer, which revealed that it was in the radius of the first step (the step-up).
UT procedures typically specify what transducer is required; no substitutions are allowed without Level III approval. The procedure used for the amusement park recognized that many Level II technicians in the field are working with a limited selection of transducers. As a result, the procedure recommended using a 0°, 5 MHz, 3/4 in. diameter transducer, which has a 9° beam divergence in steel, but it also listed the beam divergence of other transducers to assist the technician in the field to select a transducer that was closest
to what was recommended. I did not have the recommended transducer so I used a 0°, 5 MHz, 1/2 in. diameter transducer, which
has a 13° beam divergence in steel.
On this cylinder anchor shaft, I did not see geometry indications from the step-ups on both ends. Using the same transducer on a different shaft of a similar design, I did see geometry indications from the first step-up. So how much beam divergence is too much? The procedure did not address that question, but my opinion is if you see geometry indications from a step-up, the transducer has a wide beam divergence for the item being inspected.
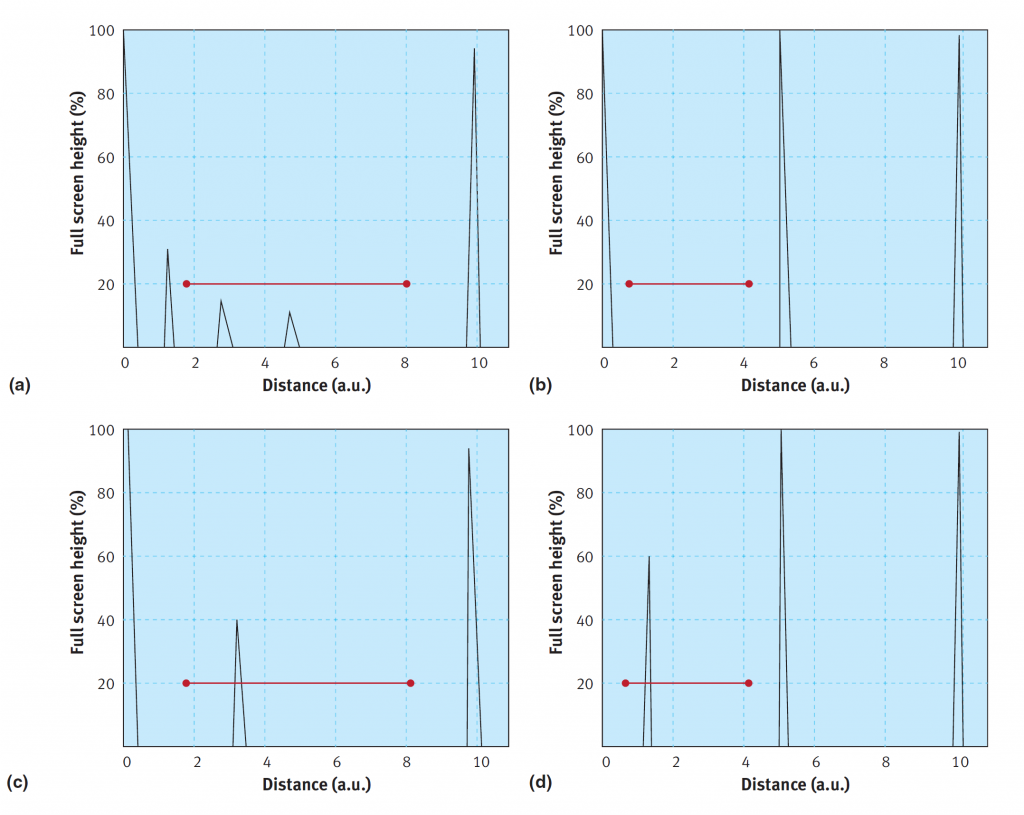
in Figure 2a; (c) no geometry indications from the first step-up on a shaft design similar to Figure 1d; and (d) reject indication in the same
shaft shown in Figure 2c.
In Conclusion
Verification of suspect indications can be problematic. One would think that if a suspect indication is visible from one end, then it should be visible from the other end as well. With the cylinder anchor shaft the indication was not seen from the other end. It could have been beam divergence, attenuation, and/or orientation of the reject indication. But it does help one understand why many of these procedures say the item should be examined from both ends. If it cannot be inspected from both ends, the reason why not should be explained in the final report.
If there is a suspect indication, someone may suggest scanning it from the opposite direction using a 45° shear wave transducer, but there are problems with that. For starters, it might not be practical. It may
require removing the shaft or pin, and if you are going to do that, you may as well do a wet fluorescent magnetic particle test. But if one insists on trying to verify it with shear wave, you need to ask yourself
a couple of questions. First, is there a written procedure for using a shear wave transducer in this application? And second, do you have a shear wave transducer with a contoured surface to fit the outside
diameter? Hopefully you are not planning to use a flat shoe on a round surface.
Final verification can always be done using a third NDT technique called the “fingernail test.” The fingernail test is a non-typical inspection technique used to evaluate surface indications found with magnetic particle testing or liquid penetrant testing. To do this test, run your fingernail across the suspect indication and feel for it to catch on the edge of the crack. It acts as additional confirmation of what you found using the proper NDT techniques.
Stay tuned for the second part of this in-depth overview of ultrasonic testing in which David Reid will address the testing of anchor bolts on highway signs and traffic signals. Part 2 will be posted on August 18, 2020.
David J. Reid, CWI is an ICC Special Inspector in F&R’s Chesapeake operations center. He is a Level II Magnetic, Particle and Ultrasonic Testing Technician and his nearly 30 year career in nondestructive testing and metals services has spanned projects from aviation and transportation to industrial, power and commercial construction.
REFERENCES
ASTM, ASTM E 587: Standard Practice for Ultrasonic Angle-beam Contact Testing, ASTM International, West Conshohocken, Pennsylvania, 2010
AWS, AWS D1.1: Structural Welding Code – Steel, American Welding Society, Miami, Florida, 2010.
